Tips & Tricks - Get More out of Wipster
If you're a new user of Wipster or have just missed some of our recent updates, you might have missed some things:--Wipster's suite of integrations...
Naturally, subscriber count is one of the many metrics that helps lead to a successful YouTube channel. Content creators have a number of techniques at their disposal to attempt to increase this number, and each method has its corresponding pros and cons. End screens, for example, can include subscribe hovercard elements, but a staggeringly low percent of viewers actually watch videos all the way to the end. A large number of YouTubers ask viewers to like and subscribe directly, often times at both the beginning and end of their content. Many viewers, however, find this very distracting and annoying.
The overlay is a more subtle, yet extremely versatile alternative to provide a call-to-action element in your video. With overlays you can jump straight into your valuable content without wasting your viewers time with like and subscription requests. Simply overlay an animated SUBSCRIBE button during your edit and burn the graphic in with your final render. You can include it as much or as little as you’d like in your content, in any location on screen, with whatever size/color/text you desire. Truly a versatile option that will land you some conversions.
Let’s take a step-by-step look at how we can create an animated YouTube subscribe button overlay in Adobe After Effects.
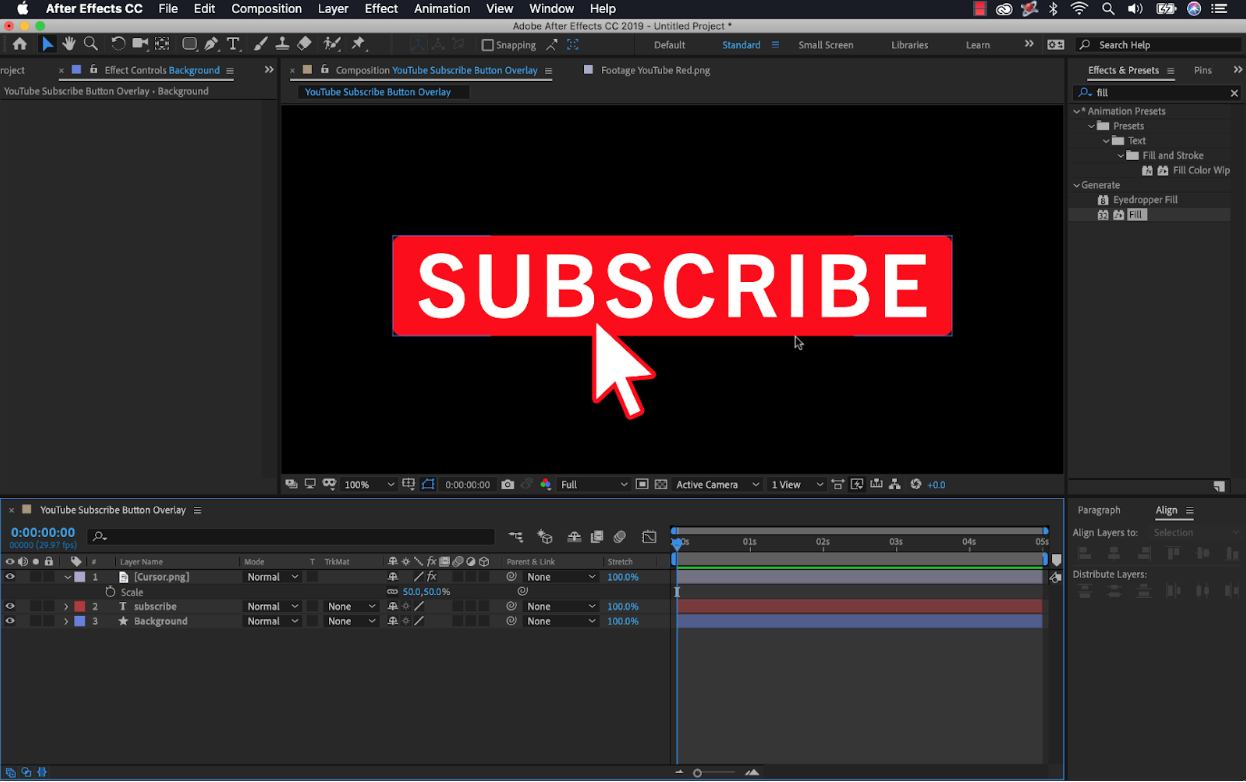
For the first step I’ll get all of my graphic elements in place. This animation is quite simple, consisting of three simple elements—a rectangle shape, a text element, and a cursor icon.
First, I’ll create a new 4K comp and then add my text via the text tool. I did a little research and found a font that resembles the YouTube font which I can activate via the Adobe Fonts website. This library of fonts is available for free for anyone with an Adobe subscription. Once I sync the font, I’ll type out the word SUBSCRIBE in Bold and in all caps in the Comp panel. Using the Align panel I’ll center it both horizontally and vertically.
For the background of the text I’ll grab the Rectangle shape tool and change the color to YouTube red. I can sample the color via the color picker and a screenshot of YouTube’s homepage. With the color selected I’ll drag and create a rectangle just behind the text. Once again, I’ll center the rectangle using the Align panel. Finally, I’ll adjust the size, round out the edges of the path, and then parent the background to the text layer.
For the cursor, I’ll go to a website called Iconfinder and download both a mouse icon as a PNG file. PNG is an image format that will allow me to have an alpha channel, so all I’ll need to do is drop this element in and resize it. With all of the pieces of my graphic in place, I’m ready to bring this animation to life.

First, I’ll focus on animating the button, bringing it on screen via a horizontal scale. With the background layer selected I’ll press the S key to open up the Scale attribute. Next, I’ll turn off the Constrain Proportions option and then animate the first property from 0% to 100% over the course of one second. To smooth out the animation, I’ll press F9 to add some Easy Ease and then adjust the speed via the Graph Editor.
Animating the button out is quite simple. For this I’ll copy the first two keyframes and then paste them at the end of my composition. Then I’ll select the last two keyframes and go to Animation > Keyframe Assistant > Time-Reverse Keyframes. Now the background animates off just as it animated on screen.
To have the background reveal the text element, I’ll need to create a track matte. For this I’ll simply duplicate the background layer, rename it Text Matte, and then drag it above the text layer within the timeline. Then I’ll switch the Track Matte of the text layer to Alpha Matte and voila, my button is now animating on screen beautifully.
For the cursor, I just need to animate the position over the button, hold for a second, and then animate it back off. Just after the cursor comes over top of the button, I’ll keyframe the scale of the text layer to to quickly scale down ever-so slightly and then back up. This will replicate a button push. To have the background change color, I’ll add a Fill effect and then keyframe the colors from the YouTube red to black.
As a final touch I’ll add a sound effect. YouTube has a library of sound effects here. I did a simple search for computer sounds and found a nice click that I could place just at the time of the click animation. With everything now in place, I’m ready to export my animation.

The key to making this overlay work is to include the alpha channel in the export. For this, I just need to be sure to choose the correct format when rendering out the animation. With my composition prepped and ready to go, I’ll select Composition > Add to Adobe Media Encoder Queue. Inside of Adobe Media Encoder I’ll change the Format to Quicktime and use the Apple ProRes 4444 with Alpha Preset.
Once rendered out I’ll now be able to bring this video into any non-linear editing software and simply overlay it on my footage and scale and position as I desire. And since I created the animation in a 4K comp, I can simply scale it down to work in 1920x1080 sequences. In Premiere it’s as simple as clicking Edit > Video Options > Scale to Frame Size.
So just like that, I now have a reusable call-to-action graphic overlay that can help bring me new subscribers. And since it’s an overlay, I can use it in any non linear video editing software I desire. Also, if I get some extra time on my hands I can create social media graphics based on the same theme, or even motion graphic template files for use inside of Adobe Premiere Pro.
If you’d like to download a free version follow the link here.
So what do you think? Do you use custom overlays in your YouTube videos?