
Editors are storytellers. We take a mountain of puzzle pieces and assemble a picture: something watchable, something compelling. Like any other creative endeavour, it’s important to know our tools. Mozart couldn’t express himself without knowing his scales, and so to with editors: by knowing the fundamentals of your tools, you allow your creativity to flow unhampered.
In this series, we’ll look at how to get the most out of Premiere Pro, starting with some of the basic native tools and controls, before delving into advanced tips, tricks and techniques. Whether you spent years in film school or taught yourself how to wrangle an NLE, bad habits can form, ruts are easily fallen into, and creativity stagnates. Editors of all levels can find value in this series: while we assume some experience in the software, each lesson will offer something for every skill level.
Back to basics: the tools you need to know
Let’s start by revisiting those basic tools in every professional non-linear editing platform with which we scrape, slip, slide and adjust our clips to get exactly what we’re looking for. In future articles we’ll look at new ways to use these tools creatively, but for now let’s make sure we all understand their basic functions, and touch on customizing your experience with keyboard shortcuts.
Slip (keyboard shortcut: Y) – Use this tool to "slip" the trim points forward or back in the clip – the in and out points will adjust accordingly to keep the duration of the clip the same. This is a great way to tweak a clip without affecting anything else on the timeline.
Slide (keyboard shortcut: U) – A Slide edit moves a clip and has the neighbouring clips adjust accordingly to the change. This means you can move a clip to elsewhere in the sequence, and the in and out points of the clips on either side of the one being moved adjust to ensure the program stays the same length. This is another great way to tweak a clip without affecting anything else on the timeline.
Razor (keyboard shortcut: C) –The Razor tool slices a clip into two, or it can chop multiple clips in several tracks at once. While it implies some finality, the two clips left behind are still full and complete trimmed versions of the original clip, but with new in and out points.
Rate Stretch (keyboard shortcut: R) – This very handy tool allows editors to speed up or slow down a clip by dragging the tail end in either direction; the in and out points don't change. This tool can be used to fill tiny gaps, or to create a near-still frame.
Ripple Edit (keyboard shortcut: B) – The Ripple Edit is an important one – it lets us lengthen or shorten the duration of a clip and have the leading or trailer clips automatically fill in the gap without hurting the edits on either side of the trimmed clip. Using it is as simple as placing the tool over an edit and dragging to the left or right.
Rolling Edit (keyboard shortcut: N) – The Rolling Edit tool allows you to change the duration of a clip, much like performing a Ripple Edit. The difference is that the leading or trailing clip – depending on which direction you are rolling your edit in – will lengthen or shorten to keep the duration of the sequence constant. It's like changing an in or out point after a clip has been placed, but directly affecting a neighbouring clip.
Insert/Overwrite – An Insert edit means adding a clip to a sequence and forcing clips later in the timeline to shift forward to make way for the new one. To perform an Insert edit by dragging a clip, press the Ctrl (Windows) or Command (Mac OS) key to shift into Insert mode. An Overwrite edit means adding a clip to a sequence by replacing any clips currently residing at the chosen edit point. This is the default edit when dragging a clip to – or rearranging clips in – a sequence.
In/Out Points (keyboard shortcuts: I and O) – In and Out points mark the beginning and end timecode of a clip to be played in the timeline or of a selection in the Source Monitor to be added to the timeline, or they can choose the portion of a clip to be trimmed down to. In longer sequences they can be handy when you’re looking to only render part of a sequence.
Pen Tool (keyboard shortcut: P) – Premiere Pro’s Pen Tool is different from the one in programs such as After Effects or Illustrator. In Premiere, it’s used to set or select keyframes, or to adjust connector lines in a timeline.
Lift/Extract – Lift and Extract are handy tools to work with footage and the clipboard. Lift will copy a clip to your clipboard and remove the selected portion from the timeline, leaving a space where the clip was previously. Extract will do the same except it will close the hole left behind, in a ripple manner.
Making note of the keyboard shortcuts for a few other common tasks will save you time throughout the day. A couple of favorites are the tilda key (~ or `) to toggle the focus window to fullscreen and the Up and Down arrow buttons to jump to previous and next edits. Clearing in and out points with Ctrl+Shift+X (Windows) or Opt+X (Mac) is also a good one.
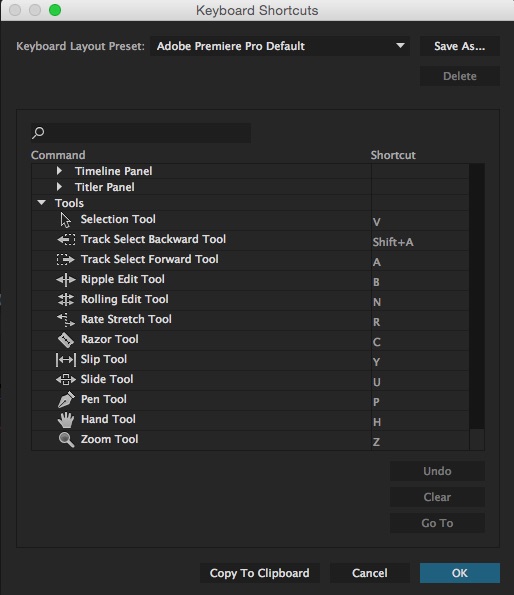
I also recommended checking out the Keyboard Shortcuts in Premiere Pro:

Adding a shortcut for "add edit" or "ripple delete" can speed up your editing tremendously, and rearranging shortcuts to make them more intuitive for you is well worth the set-up time.
It may seem like child’s play, but revisiting the basics can help you get the most out of Premiere, and save you serious time throughout the day. Nailing down these will help us as we move forward in the series.
See you next time!